‘Stunt Kites’
is a broard name for lots of different kites, everything from small beginners kites through high performance Carbon Graphite framed competition kites to large, powerfull powerfoils.
Most of the info on this page applies to all 2 line kites but make sure you read the full instructions that come with your particular kite.

WHERE TO FLY
Always fly your kite in wide open spaces well away from trees, buildings and hills. The beach, park or paddock are usually great places to fly.
Obstacles like trees or buildings within 50m of your kite will greatly interfere with the steady wind flow needed for good kite flying.
A dual control kite moves through about 150° arc so make sure the ground in front of you is free from obstacles, people and pets.


WINDS

While there is no such thing as a kite that will fly in all winds, most Stunt Kites now days have a wide wind range.
Most will perform well in 10 to 35 klm’s per hour (that’s about 6 to 20 knots). While medium winds are best for most kites, it’s important that you know the wind range for your particular kite.
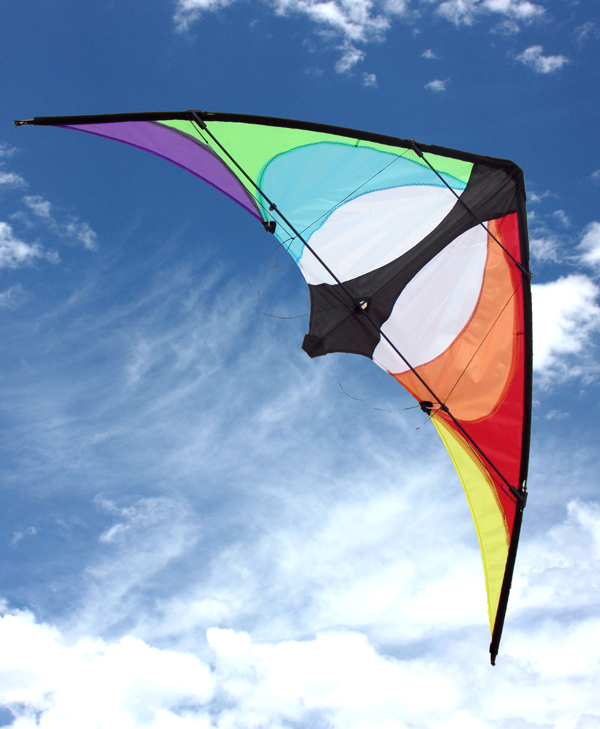
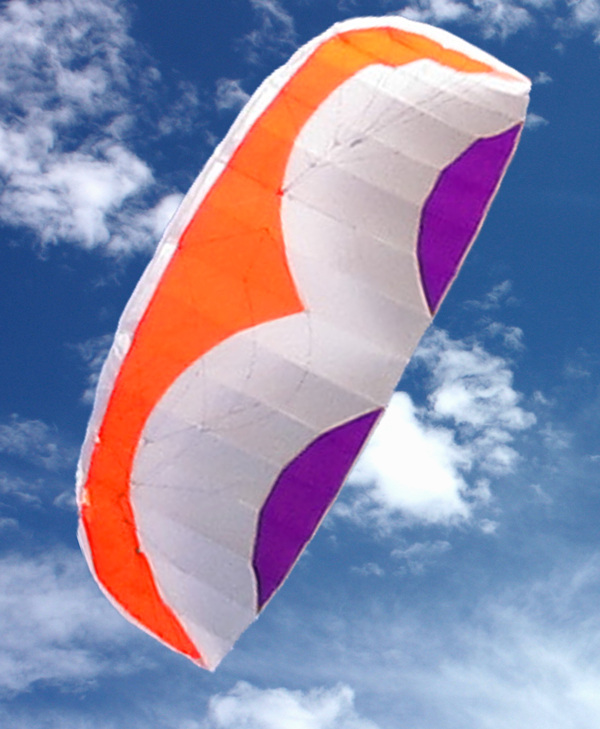
Because Carbon Graphite is lighter then Fiberglass, Stunt kites with Carbon frames like the Fluid will get up and flying in lighter winds then fiberglass framed kites. Foils, even though they have no frames and are therefore very light, need more wind because they need to fill their cells to keep the kite in shape.
Wind is too light: Your kite won’t lift away from the ground if there is not enough wind. As the wind picks up a little it will lift but may not perform well, it will struggle to do basic manoeuvres like spins and turns. You won’t do any harm if you persist but it will be pretty frustrating! Our advice? Go home and try again later on!
Wind is too strong: Don’t do it! This is when you break stuff….lines break with too great a pull, rods break (even in the air), sails stretch and rip because of strong pressure. Hurting bystanders is also much greater risk in strong winds because the kite is more powerful and faster making it much harder to control.
How strong is too strong? Can’t say sorry. It depends on your kite, your experience and where you are. Better to pay heavily on the safe side until you are sure.
ASSEMBLY
Rigid framed kites
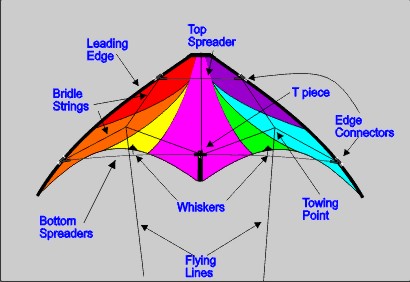
– you should have the main sail/frame/lines as one piece, a set or pair of flying strings (lines) on handles and 2 or 3 loose rods (we call these spreaders).
– Slide the 2 longer SPREADERS into the black rubber edge connectors on the side of the kite (smaller kites may only have 1 bottom spreader that goes from side to side.) and then into the T Piece in the center.
– Do the same with the shorter Top Spreader into it’s Edge connectors.
– Connect the Whiskers by pushing the thin White Fiberglass rods (the whiskers) into the Black Rubber Joiners on the Bottom Spreaders…..yes, they’re meant to bend.
– At this stage, check that strings are not twisted or caught under the spars or fittings.
– Use a ‘Larks Head’ knot to join the loops in the end of your flying lines to the ‘towing point’. (Larks Head Knot details are shown below)
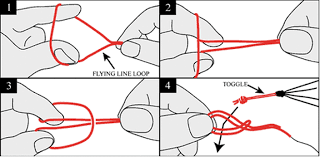
Larks Head Knots
Or, check out the images here to see how to do it. Once you’ve made the knot like the diagrams, simply slip the ‘Rats Tail’ …the end of the Bridle String…through the Loop of the Larks Head and pull tight.
It’s easy to do and easy to undo.
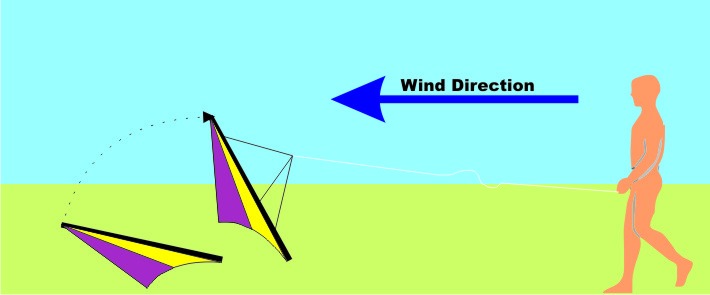
PREPARING for TAKEOFF
Choose a flying site with plenty of open spaces: – no obstacles to crash into like trees, buildings, power lines or fences and with open space BEHIND you. If the wind coming toward you is rolling over obstacles like trees or buildings, it will swirl and push down in eddies making it very, very difficult to fly – we call this ‘dirty air’.
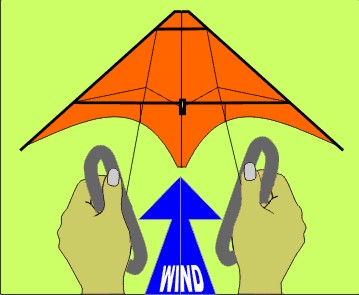
Set your kite down FACING THE WIND (your BACK will be to the wind) and let it fall backwards. You’ll notice that the WHISKERS make the kite ‘3 dimensional’ so it will sort of ‘stand up’, not lay flat. This will make it a lot easier to launch the kite.
Your hands should be:-
– pretty close together
– out in front of you a bit.
– arms relaxed and loose, not straight and rigid.
Now ready for takeoff!
LAUNCH
Now simply jerk your hands down by your side and take a few steps backward. The kite will rise, the wind will catch the sail and take it skyward. Now slowly return your hands to the ‘relaxed n loose’ position in front of you.
When you launch, the kite will not go exactly straight up, it will probably roll a little to one side or the other (because the wind is never exactly at your back or the lines are never exactly the same length….) Simply pull ever–so-slightly on the opposite elbow. e.g. if your kite is rolling to the left, pull your right wrist slightly back to get the kite to sit still straight above you. Your first goal is to KEEP IT STILL.
Keep your movements Smooth and Small. Avoid hard, jerky movements. If you pull too hard you’ll overcompensate and it will roll to the other side….just keep re-adjusting your wrists until it’s still, at the top of the sky. This is actually a precision skill that will take a few launches to master…The greatest skill you can show yourself is to keep the kite STILL. Practice it…
FLIGHT
Ok, you’ve got your kite into the air and it’s sitting quite still at the top of the sky. Now let’s look at how to steer it and make it go where you want it to go.
Steering your kite is governed by the 3 rules of control:-
1. Only ever pull one side at a time.
If you pull on both lines together, all you will do is bring the kite a little closer to you, by pulling on only one line, you make the kite UNBALANCED and it will then MOVE to try to re-balance itself.
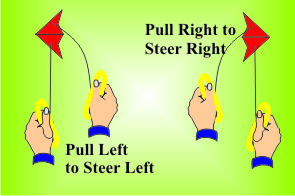
So, only pull on one line or the other, pull left to steer left, pull right to go right.
Hard pull for tight turns, easy pull for gentle turns.
2. UNDO everything that you DO.
If you pull-pull-pull-pull you’ll end up with your hands against your chesh and no-where else to go….no control. Get into the habit of UNDOING each action that you DO.
If you pull left to do a left circle, PUSH left at the end of the circle. This way, your hands will stay relaxed and loose in front of you….the best flying position.
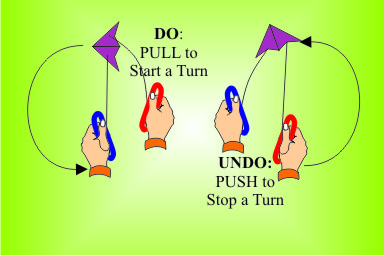
3. Only undo when kite is pointing skyward.
Once you start a circle, wait for the kite to finish the circle before you push your hand back out again. When you’re good enough to do an ‘underhand turn’…where you deliberately steer towards the ground and turn UNDER very close to the ground…you can forget Rule 3!
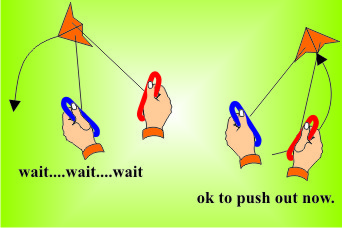
So, your flying action is something like this:-
Decide to do a LEFT CIRCLE – Pull Left – Hold it – Hold it – Hold it until the kite has finished it’s circle and is pointing upwards again – Push left to Still.
While you’re learning to fly, just do one movement at a time. If you do a Left circle, WAIT at the top of the sky for 3 seconds, with the kite still, before you start the next manoeuvre. This way you are showing youself that you’ve got good control of the kite rather than you just holding on while it does it’s thing.
Try these movements slowly at first until you get the feeling of control. Inexperience and strong winds will surely lead to crashes & broken rods…..learn to fly in light winds.
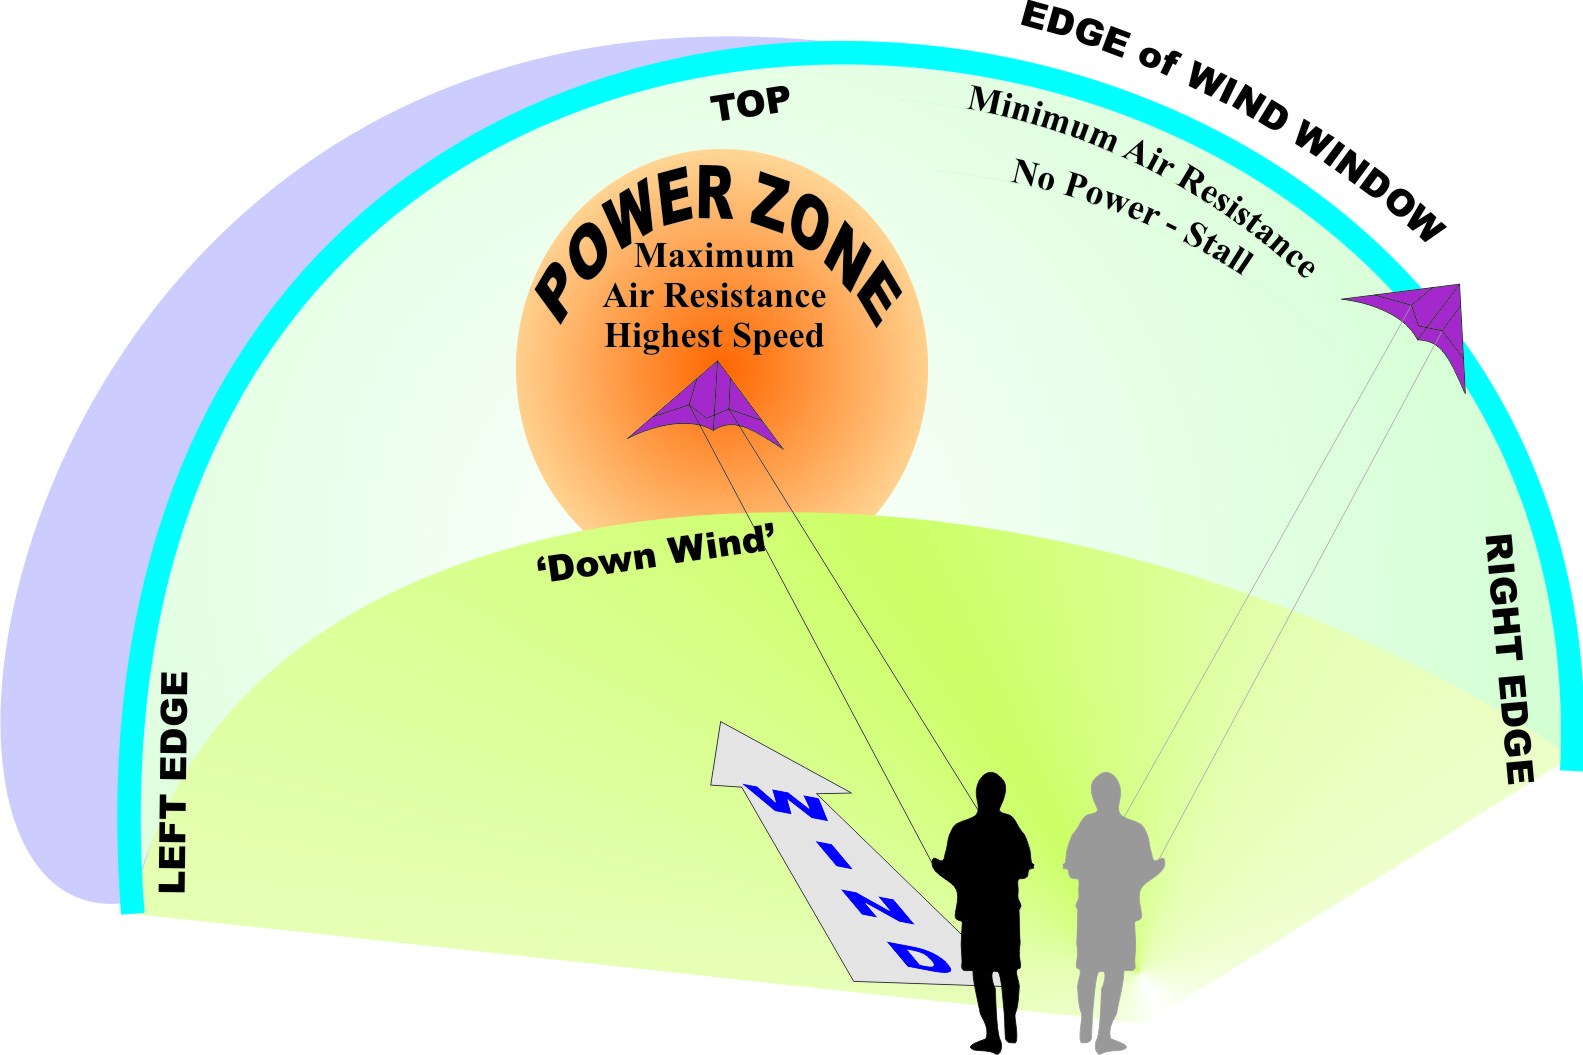
The WIND WINDOW
This extends from the ground to us high up as the kite will go until it stalls and from as far left and far right as it can go without stalling.
At the edge of the Window, the kite won’t fall out of the sky, it will just ‘stall’, or not go any further. At this point your only choice is to turn the kite back into the window to catch the wind.
A kite sail will catch most wind when it flys directly downwind….we call this the Power Zone, this is where your kite is most powerful and fastest, it’s also where you will have most control.
LANDING
About 1 metre above the ground, do a SNAP TURN* to point the Nose UPWARD.
* Use both hands – PUSH with one and PULL with the other, it’s a much faster turn then a regular one hand turn. *
Now quickly walk/run a few steps toward it. The lines will lose tension and the kite will settle to the ground, ready for relaunch.
CRASHES
Try to avoid them but they will happen! This is when stuff breaks!
– While you’re learning, STAY HIGH. This gives you room to make mistakes. If you are close to the ground and you forget how to turn it won’t end well so stay high and give yourself room.
– A Kite cannot crash at the EDGE of the Wind Window, it simply comes gently to the ground. It only crashes in the Power Zone. While you are learning, do your fancy stuff out at the Edges, only move through the Power Band, don’t fly in it.
CARE & REPAIR
Most good kites now days are made from non-deterioating materials like fibreglass, nylon and carbon. A little care and attention will give you years of fun and enjoyment (but some running repairs may be necessary.)
SAIL: Sails are usually made from Spinnaker grade ripstop nylon or polyester. It is very strong and will withstand the rigours of much flying and many crashes. Repairs, if necessary, are best made with adhesive sail repair tape from your local sailboat chandlery. Stick on a patch and sew it down. If stitching needs resewing, use a similar stitch to that being repaired and use normal polyester cotton.
SPARS: Kite spars are guaranteed to do two things: Perform brilliantly … and break! They are very rigid and very light but they are also quite fragile … so be prepared for breakages, they will occur. Replacement spars are available from us or from your local kite shop or archery shop for a few dollars each. Take your existing spars with you so you can get an exact match. Call or email us if you get stuck finding replacement rods. Rods can break at any time, on a seemingly gentle landing, while assembling your kite, they have even been known to break in flight! When cutting fiberglass or carbon rod, use a hacksaw and twist as you cut…don’t cut straight through like you would a piece of timber, twist as you go so you are cutting from the outside into the inside. This will stop splinters on the bottom of your cut.
LINES: Lines will eventually wear out because of the friction caused by constant rubbing. The only solution for this is replacements but it will be heaps of hours of flying before this happens. Worry about it in a few years time. If you fly in stronger winds (over 20 knots) be prepared for breakages! Regular twisted nylon (comes with all of our Fiberglass framed kites) can be tied back together if it breaks. Dyneema lines (with bigger High Performance kites) need to be spliced back together if they break, don’t tie a knot in them, it weakens the line and will break immediately. If you do need to splice ‘em, call us or google it. If you do want stronger lines (we don’t recommend it.) call us and we will put you in contact with your nearest supplier. Please note that Broken Flying Lines are not covered under warranty……do not use your kite in winds too strong for your lines.
CLEANING YOUR KITE: If your kite gets dirty, just hose it with Fresh Water…pay extra attention to Joints, Holes,Tubing & Spars. Never use brushes or abrasive cleaners on sail-cloth. Sand and Salt are very abrasive and can wear through the cloth easily. After flying on the beach, always shake the sand off your sail and out of your bag. It’s a good idea to give your kite a quick hose in fresh water to get thew salt and sand off when you get home. Let your kite dry before putting it back in the bag, the moisture won’t hurt it but will smell ‘like wet dogs’ when you next use it.
SAFETY RULES
Your kite is capable of very high speeds and fast changes of direction. Serious injuries can occur to fliers and bystanders unless you act safely.
COMMON SENSE AND CAUTION ARE OVERRIDING RULES
MAKE SURE that your flight Path, both in the air and on the ground, is free from all objects, people and pets.
WATCH for people and pets moving into the area below your flight path.
NEVER fly in electrical storms or near overhead powerlines, buildings, roads or airports.
BE AWARE of the great cutting force of taut control lines.